
Disclosure
My goal, as always, is to help you GROW SOMETHING, something beautiful—even better, something to eat! While sharing helpful information, I may promote products, services, or businesses. Sometimes I may receive compensation from advertising, sponsorship, paid insertions, and affiliate marketing. Whether I’m compensated in any way or not, the recommendations, reviews, and opinions that I share are my own.
As an Amazon Associate, I earn from qualifying purchases.
I am a participant in the Amazon Services LLC Associates Program, an affiliate advertising program designed to provide a means for us to earn fees by linking to Amazon.com and affiliated sites. The links that I post are for products that I’ve used myself or similar (and sometimes even better) items that are currently available–what I’d buy now if I didn’t already own them. There’s no extra cost to you when you make any purchases while accessing Amazon through my affiliate links—and I may get some extra plant money! Thank you for shopping with The Gardener Wife.
Shop with the Gardener Wife
Below are some of the products that I’ve mentioned in The Gardener Wife newsletters, blog, and/or social media posts. If you don’t see what you’re looking for, contact me, and I’ll look into it.
Edible Flowers
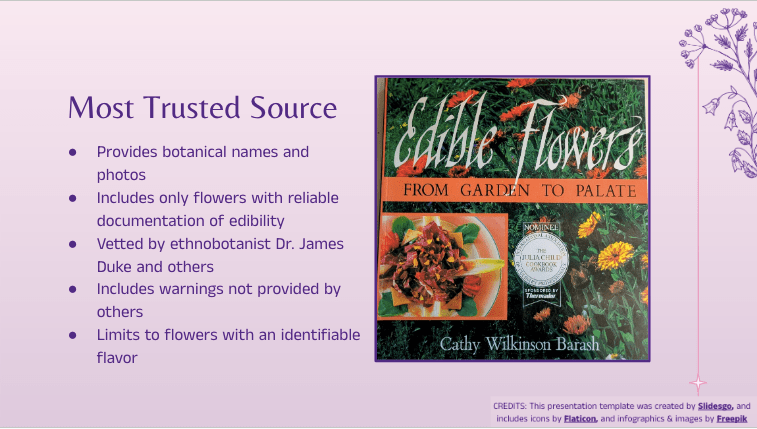
Here are the books that I trust for information on edible flowers:
- Edible Flowers: From Garden to Palate, by Cathy Wilkinson Barash
- The Edible Flower Garden, by Rosalind Creasy
Winter Sowing & Seed Starting
Seed Starting Supplies: For most indoor seed starting, you’ll need grow lights. I use plain shop light fixtures, hung with chains and S-hooks so that I can move them up and down as the seedlings grow. Instead of buying pricey lights labeled as “grow lights,” I have used fluorescent lights, one COOL one and one WARM one, in each fixture. However, now we replace those with two daylight spectrum LED lights that would fit such a fixture. Each light fixture is attached to a power strip which is plugged into a programmable timer. For seeds that germinate better at warmer temperatures, you will also need a heat mat. This one is only $15, well worth the investment if you’re going to get serious about seed starting.
Winter Sowing Supplies: You can avoid the above purchases if you do your seed starting outdoors with the winter sowing method. See my Winter Sowing Tutorial for details. The only supplies you might need to purchase for winter sowing are either a Garden Marker or grease pencils for labeling your containers in a way that will not fade when exposed to the elements for many weeks. For winter sowing, you should use a potting mix for containers rather than a seed starting mix.
Using & Preserving the Harvest

Vacuum Sealers
A good quality vacuum sealer is a necessary tool for preserving my precious garden harvests. I have been using FoodSaver vacuum sealers for over 25 years because they are the BEST way to protect frozen items from getting freezer burn and to preserve their quality. I also use my vacuum to store dehydrated garden produce in airtight jars (see below). Plus, since I love appetizers and cheese, I use it frequently to keep cheese fresh for as long as possible and to keep opened crackers crisp (using the canning lid accessory with a half-gallon or gallon-size jar). This machine is definitely worth the investment! I’m not recommending the cheapest of the line, however, because gardeners need a model with the function for sealing moist food–such as blanched garden veggies–as well as dry food. The model I currently own is no longer available, but here are others that have this necessary function.
- FoodSaver Vacuum Sealer – Space Saving Model, black
- FoodSaver Vacuum Sealer – Space Saving Model, white
- FoodSaver Vacuum Sealer with Handheld Sealer
- FoodSaver Vacuum Sealer with Handheld Sealer and Automatic Bag Detection
- FoodSaver Vacuum Sealer with Handheld Sealer, Automatic Bag Detection, and Bag Maker
- FoodSaver Accessory Jar Lid Kit – Using these lid accessories with canning jars of various sizes is better than buying FoodSaver canisters. All of my plastic FoodSaver canisters eventually cracked; glass jars have not. And the jars are cheaper!

FoodSaver Bags and Rolls are pricey compared to zip-close plastic storage bags, of course, but they’re worth it for their superior long-term storage ability. The FoodSaver works only with bags that have an embossed air channel design. Just remember to allow extra space if you plan to open and reseal your bags because the only way to open them is to cut below the seal. Thus the bag gets smaller with every use.
Dehydrators
I still have and use my mom’s old dehydrator, which does not have a temperature control or a fan to circulate the air evenly. You could get a similar one with both of these features for a pretty low price.
- Round Dehydrator, 5 trays = lowest price
- Round Dehydrator, 6 trays + timer, overheat protection, mesh screen, and fruit roll sheet
- Square Dehydrator, 8 trays + timer, overheat protection, and higher temperature range
You’ll find more information about dehydrating produce in this blog post: Celery Increase.
Vacuum Sealers – I like to store my dehydrated food in vacuum sealed jars, using the FoodSaver accessory jar lid kit. See the “Vacuum Sealer” section above for more information.
TIPS: This is a good way to reuse canning lids, which should be used only once for canning. Another trick I’ve learned, if the accessory jar sealer is not sealing, is to put two lids on top of the jar. That extra bit of thickness often helps the lid on the bottom to form a seal with the jar.
Canning Supplies
Canning Recipe Books:
- The Complete Book of Small-Batch Preserving
- Complete Book of Home Preserving
- Ball Blue Book Guide to Preserving
Canning Tools:
- Water Bather Canner & Utensils Set – Everything needed except the jars and lids
- Stainless Steel Canner & Rack – Can be used with glass cooktops
- Canning Utensil Set, 3-piece
- Tomato Strainer – Strains tomatoes and removes peel and seeds
Garden-to-Table Cooking
GARLIC GADGETS – You don’t NEED any of these garlic gadgets since knives will do the trick. But these are what I use whenever I need to peel and mince more than 2 or 3 cloves of garlic—it’s just so much easier!
Garlic Peeler – Of course the easiest way to peel garlic is to smash a clove with the flat side of a chef’s knife. When you don’t want the garlic to get smashed, use this.
Garlic Press – I prefer this rocker style garlic press. It’s easier to use than the hand grip style, and it doesn’t smush the garlic up as much. That means you could even use it for mincing garlic if need be. Plus, the bigger size openings make it easier to clean. I see better deals on this item, but they’re not the same brand as I have, so I can’t guarantee they’re the same size. Here’s one that looks good to me: garlic rocker.
Garlic Chopper – My favorite garlic gadget! This tool makes short work of mincing several cloves of garlic at once. I demonstrated it in the middle of this video. Here’s one that’s currently cheaper and comes with a bonus garlic peeler: good deal on Chef’n Zoom.

NON-STICK PAN – I’ve posted a video about making Swiss Chard Tortilla Española, my favorite chard recipe. This dish has a tricky part. After the eggs are set, you have to flip the tortilla over and slide it back into the pan to brown the other side. This trick requires a good nonstick pan (I like Scanpan), a plate that’s a little bigger than the pan, a spatula, two oven mitts, and a little dexterity. You’ll see me do it in the video. Here’s a good pan to use for this dish. It has deep sides and a cover, which are helpful for cooking the chard down. And the nonstick finish is unbeatable.

MEAT THERMOMETER – Here’s my top tip for cooking a nice juicy turkey. I don’t care if you’re roasting, frying, smoking, brining, basting or bagging your turkey: the secret to moist white meat is to stop cooking it as soon as it is done. I recommend a digital thermometer probe that beeps at you when it hits the right temperature, 165 degrees internal. Here’s the one I have:

SLOW COOKER – I have always preferred a slow cooker with a nonstick removable pot that can be used on the stovetop. You don’t have to dirty another pan for recipes that require browning meat or sautéing vegetables before slow cooking. It’s nonstick and easier to clean than a ceramic inner pot, too! Here’s the current model of my favorite slow cooker.

IMMERSION BLENDER – I’m not very picky about these because I’ve had no problem with the cheap off-brand one I got years ago. I’m glad the outside of it is plastic so it doesn’t scratch non-stick pans. I can’t guarantee that this one is just as good, but I think it’s a good value for the price.

GAS GRILL – I love my grill. I chose a model that cooks evenly all over the grate so I can easily grill a bunch of burgers for a crowd. Plus, it’s blue! And blue is my favorite accent color for the deck. This color was actually discontinued before I got my grill, but I happened upon the last one on clearance at our local Ace store. The model I have has also been discontinued, but Weber is once again producing similar grills in blue as well as several other colors: crimson, smoke, copper, and black.

CAKE DECORATING – In honor of National Cake Decorating Day, October 10, I’m adding the flower spikes I use to decorate cakes with fresh flowers.
Growing Tomatoes
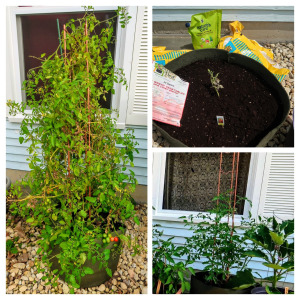
Mulching/Watering Saucers – I love growing tomatoes, both in raised beds and in containers. (Scroll down to “Container Gardening” for container recommendations.) But thanks to humid weather conditions, I’m plagued with fungal diseases year after year. These are often spread by water splashing soil up onto the plant. And that’s why it’s important to water from below and mulch around tomato plants. Long ago, I used sheets of red plastic mulch fabric. Then I found Tomato Craters, the red plastic saucers that everyone always asks me about. These hold up far better from year to year, and they allow me to interplant my tomato beds with other crops instead of covering them entirely with mulch. Now there are better models, such as Plant Halos, which have a larger reservoir and spikes that allow for deeper watering of tomato plants.
As mentioned in my post, Dealing with Tomato Diseases, tomato plants in my area are prone to blight and other soil-borne diseases. I use Tomato Craters to prevent rain from splashing soil up onto the plants. I run soaker hoses underneath them. The Tomato Craters also prevent cutworms from attacking my seedlings. I got mine on clearance before they were discontinued, but there are similar products available now which may work even better:
Tomato Automators – https://amzn.to/3cc5Om6
Tomato Halos – https://amzn.to/3fKJan7

Organic Fungicides – I also try to fend off fungal diseases with either a copper fungicide or with one that has Bacillus subtilis in it, such as Serenade.
Organic Fertilizers – Even though I amend the soil in my raised bed with compost, I add an organic fertilizer when I plant tomatoes. This year I used This year I used Jobe’s organic slow release plant food for tomatoes: https://amzn.to/34YvsGZ.
Plant Supports – Soon after the tomatoes are planted, I put up these supports for them:
Heavy Duty Tomato Towers – https://amzn.to/3v6f69y
Tomato Ladders – https://amzn.to/34ZST2m
Composting
This is the type of compost bin I have. I won’t get into a whole lesson on composting here, but you should know that this is bin is for cold composting. I put grass clippings and dried leaves in it, add a bit of manure and water, and mix it all up (see next tool). All of it decomposes and becomes nice rich compost. However, it never gets hot enough to kill off all the seeds in it. If you have the space to do hot composting, which requires a pile that is at least 1 cubic yard in volume, then go for it. If not, this is a nice neat way to put your grass clippings and dried leaves to good use for your garden.

One of the drawbacks to the above bin is that it’s difficult to maneuver a shovel in there to mix everything up, especially if you have poor upper body strength. This compost crank is the answer! Of course, I still like it when my husband does the compost turning, but this tool makes it much easier for me to do it when I need to. You just turn the handle until the corkscrew tip gets to the bottom, and then lift it up. Keep doing that all around the bin until everything is mixed. NOTE: I have also found this to be a useful tool for mixing up a batch of potting mix.

I also have a tumbling compost bin, where I put our kitchen scraps. Mine does not have two chambers like this one does. When it gets too heavy to spin, I transfer the contents, which are already partially composted, to the cold compost bin to charge that up and finish composting over there. This newer design lets one side finish composting while you are feeding the other side.

Feeding Hummingbirds
Window Hummingbird Feeder – I have tried several different hummingbird feeders, and the ones that perform best for me are the simple red plastic ones that you can buy anywhere. Pretty ones made from glass or other materials have turned out to be leaky and/or impractical. The only special type of feeder that I have really enjoyed over the years is a red plastic one with suction cups to attach it to a window. I love having it by my kitchen window so I could see hummingbirds up close while standing by the sink–so cool!

Ant moats – An ant moat comes in handy for keeping ants out of a hummingbird feeder that’s hanging from a shepherd’s hook or any other stand. Just make sure you don’t let all the water evaporate. This red plastic ant moat is the kind I’ve used for years–until the little piece that holds its hook at the top broke. I guess the plastic had grown brittle over the years. Now I’ve ordered these metal ones.
I just posted a video that describes our composting system. The advantage of a tumbling composter is that you can mix the contents easily so it produces finished compost faster. We use ours all year round for collecting kitchen scraps. The disadvantage of a tumbling composter is its small size: it will not make enough compost for a large garden. Besides using it for one bed at a time like we just did, we often transfer the contents of our tumbling composter to a cold compost bin in order to charge that up. Cold compost bins are where we put grass clippings and dried leaves. They’re larger than the tumbling bin but, of course, harder to mix. To make that task easier, I recommend a compost crank. This nifty tool is also handy for mixing compost into potting mix or making your own mix.
My Favorite Thing 2023: PLANT DOLLY
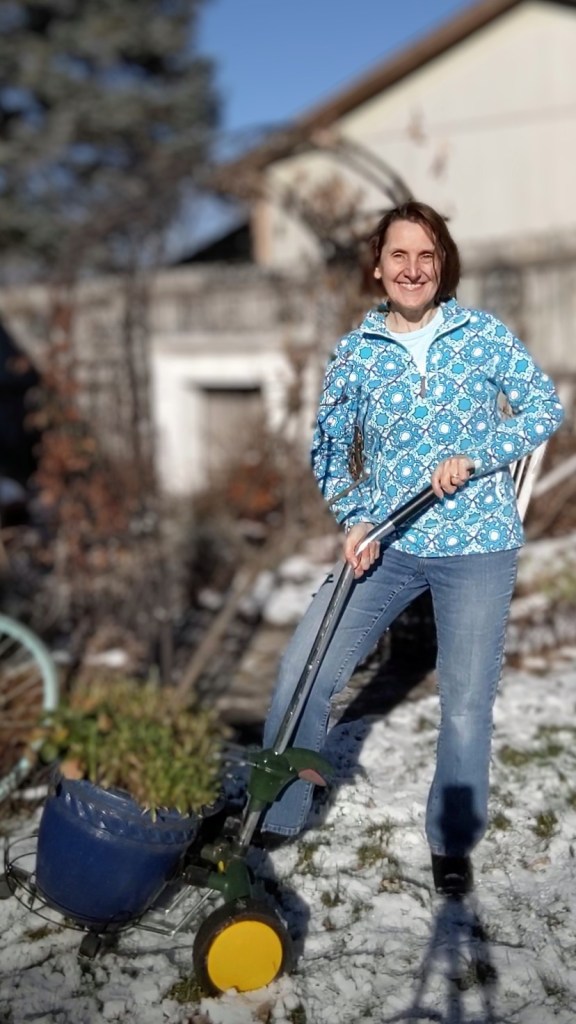
I grow many plants, both edible and ornamental, in containers. Many of my containers are large and heavy–too heavy for me to lift and move on my own. Instead I use the plant dolly that my husband gave me for Christmas one year–one of the best gifts you could give any gardener! It’s designed specifically to hook over the lip of a plant container, but I’ve used it with buckets and other heavy things like bags of potting soil.
Thanks to her new potted plant mover, the gardener wife no longer has to say “Stan, move this impossibly heavy potted plant for me.” Now she can simply say “Stan, grab the new potted plant mover and move this impossibly heavy potted plant for me.”
—Stan Rea, Facebook post
Protecting Garden Plants
Mesh Garden Netting
I use garden mesh netting to protect my crops from insects and birds. This week I covered a potted fig tree with it because I don’t want any birds or wasps to beat me to the fruit before it ripens. This garden fabric comes in all sorts of sizes and can be easily cut to needed lengths. I’ve bought the 10′ x 12′ mesh netting and cut it in half lengthwise, and I’ve bought a two-pack set of almost 10′ x 6.5′ mesh netting.
Scaring Away Birds
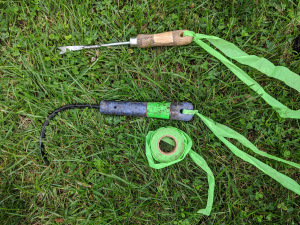
Scarecrows just don’t work, do they? At least my Mrs. Greenbeans hasn’t been able to stop birds from nipping at the bean seedlings around her skirt. For the last several years I’ve had trouble with birds going after my snow pea shoots and green bean plants. I could cover them with shade tunnels to protect them while they were small. As the vines grew, I tried hanging various kinds of shiny, noisy, and twirling objects from their supports, but that didn’t work to keep the birds away. And I know from past experience that bird netting gets entangled with these vines and causes other damage. Then last summer I heard about bird scare tape, so I ordered this kit and gave it a try.
I have found it to be very effective, so now I put it up right at the start as soon as I plant pea seeds. I haven’t use the little stands that the kit came with because I can wire the tape to my pea and bean supports. Wiring it on works better than tying it–it just doesn’t flutter around as easily when it’s tied in a knot. Last year I ordered just tape, not the kit. I also got a narrower bird scare tape, 1″ wide, to use in other areas, such as my fruit trees. If you want to do the same, this set with both sizes is a good choice.

Repelling Insect Pests
Mosquitos – I try to keep mosquitos at bay around my deck and yard all season long by emptying anything with standing water in it every few days. It also helps to light a fire and/or citronella bucket candles when we’re outside in the evenings.
Flies – At dinner time I keep covers on all the serving dishes so that flies don’t land on the food. For platters that don’t have a cover, I use a stainless steel mesh dome.
Wasps – Yellow jackets are usually at their peak by late summer, but they’ve not been troubling us while we eat dinner on the deck. Nor have any wasps tried to build nests in the soffits around our deck this year. I like to think that’s because the wasp nest decoy that I hung by the table in early May has deterred them from nesting near it. However, some say that fake wasp nests, such as the Waspinator, do not really work. Part of the problem, I believe, is that folks don’t hang the decoys up early enough in the season, before any wasps start building a real nest. I’ve use the Waspinator before and it seemed to work, but I did not like how flimsy its material was. It disintegrated after one season. This year I went with a different kind; it’s actually a beige paper lantern. There’s no need to stuff it with anything, and I can fold it flat again for storage over the winter.

BONUS TIP: If you get an in-ground nest in one of your garden beds, there is no need to buy anything to remove it. I had a ground hornet nest in my raspberry bed a couple of years ago. I got rid of it by following these instructions from my master gardener coordinator: “leave a hose on slow OVERNIGHT.” (I emphasize overnight because we tried it for a few hours the first night and the hornets were back the next day.) Overnight worked. Then we filled the hole in as much as we could with sand and covered the entrance with a plastic jug and a brick to keep them from coming back. A few came and hovered around during the day, but then they left altogether and did not come back. I enjoyed harvesting a great crop of organic raspberries this year with no fears of getting stung. Do NOT use any chemicals, including Dawn, if you want to continue growing herbs or other edibles in that soil.
Best Shovels
Root Slayer Shovels – Once you get one of these amazing tools made by Radius, you’ll want the others, too. I started with the weeder, and then I realized that the serrated shovel would make it possible for little old me to dig up large shrubberies all by myself. So I bought a bundle set with two different sized shovels and an edger. Here’s an example of how I use them: Best Shovels. When my husband or sons are around to help me with the digging or edging, these tools make the jobs easier for them also.
- Root Slayer Bundle
- Root Slayer Shovel
- Root Slayer Nomad
- Root Slayer Round Head Shovel
- Root Slayer Perennial Shovel (smaller & higher than regular Root Slayer shovel)
- Root Slayer Edger
- Root Slayer Weeder
Watering Routine
I’ve shared a video of my watering routine. For more information on the best watering practices, see my post here: Watering Tips.
Tips for Using Rain Barrels
After preparing our rain barrels for winter, I wrote a blog post with all of my rain barrel tips.
“If you have rain barrels, you should be careful about using their water on edible plants because of possible contamination from roofs and gutters. You should water the soil only; do not get the plants wet. Stop using the rainwater a couple weeks before harvesting. I recently found this extension service article that discusses the question in much more detail: https://njaes.rutgers.edu/fs1218/. If you don’t want to read the whole thing, you should at least scroll down to the ‘Best Practices and Recommendations’ section at the end. It talks about using a bleach solution to lower the risk of contamination of edible plants. ” -excerpt from my post, Watering Tips.💦This is the kind of rain barrel I have. We installed our rain barrels with this kind of diverter. And this garden cart is what I use to carry several gallons of water at a time to my garden containers. This is an idea a friend shared with me and I love it. It’s a lot easier than walking back and forth with a watering can all the time. I fill just the bottom third or so of the cart with rain barrel water, wheel it over to my containers, and use an old pot as a ladle to water the plants. This has been a lifesaver since I no longer have young children to do the hand watering chore for me.
Shakespeare Picnic Accoutrements

I’ve shared several posts over the past week highlighting the picnics we enjoyed recently at the Illinois Shakespeare Festival, and now I’m looking forward to another one closer to home tomorrow. If you’d like to learn how I prepare these elegant garden-style picnics, see my blog post: Elegant Picnics.
If you’re shopping for your own picnic gear, here are my recommendations:
I enjoy looking for the following items while thrifting and antiquing, but here are some links in case you prefer shopping online:
Garden Bench
I put off buying a new garden bench as long as I could—until the old wooden bench caved in, in fact. Now I’ve got a beautiful metal garden bench that should last much longer.

Tools
First, here’s a tip for keeping track of those small hand tools that tend to get left behind and lost in the garden. Tie a 2-foot length of brightly colored flagging tape onto the handles. I used to use duct tape, as you can see in my photo, but these longer pieces are easier spot. Now I don’t have to replace my weeding fork every year! Here are my favorite tools that I always mark with this ribbon.
Weeding: Here’s a good set of weeding forks:

CobraHead is another great tool for cultivating and planting, as well as weeding.

Hori-Hori Knife is very versatile. Mine was a brilliant Christmas gift from my husband, and I’d be very sorry to lose it. I use it for transplanting, weeding, digging, planting, and even sawing through grasses. Every gardener needs one of these!

Raised Bed Gardening
RAISED BED CORNERS – Over time the corners of our raised beds have fallen apart, and my husband has been replacing them with these aluminum corners. They’re pricey, but they are the sturdiest, longest lasting kind we could find, and we’ve not had any problems with them. Each year he digs up and fixes a few of the worst corners. This year we also have to replace some wood, so we’re getting longer corners to rebuild an entire bed and make it higher. They come in sets of two, so you have to get two sets for each bed you’re building.
- 6″ Aluminum Raised Bed Corners
- 8″ Aluminum Raised Bed Corners
- 10″ Aluminum Raised Bed Corners
- 15″ Aluminum Raised Bed Corner
PLASTIC COVERING – When we put our kitchen garden to bed, my husband shovels and mixes composted manure into the vegetable beds and covers them with black plastic, stapling the plastic to the wooden edges of the raised beds. I use these covers mainly to keep weeds from growing before I start planting in the spring and also so the beds will be drier and warmer and thus ready to plant earlier. We get the 10′-wide rolls and cut them to 5′-wide because that’s what is available at our local hardware store. If you order online, the 10′-wide rolls are cheaper than buying twice the length of 5′-wide rolls.
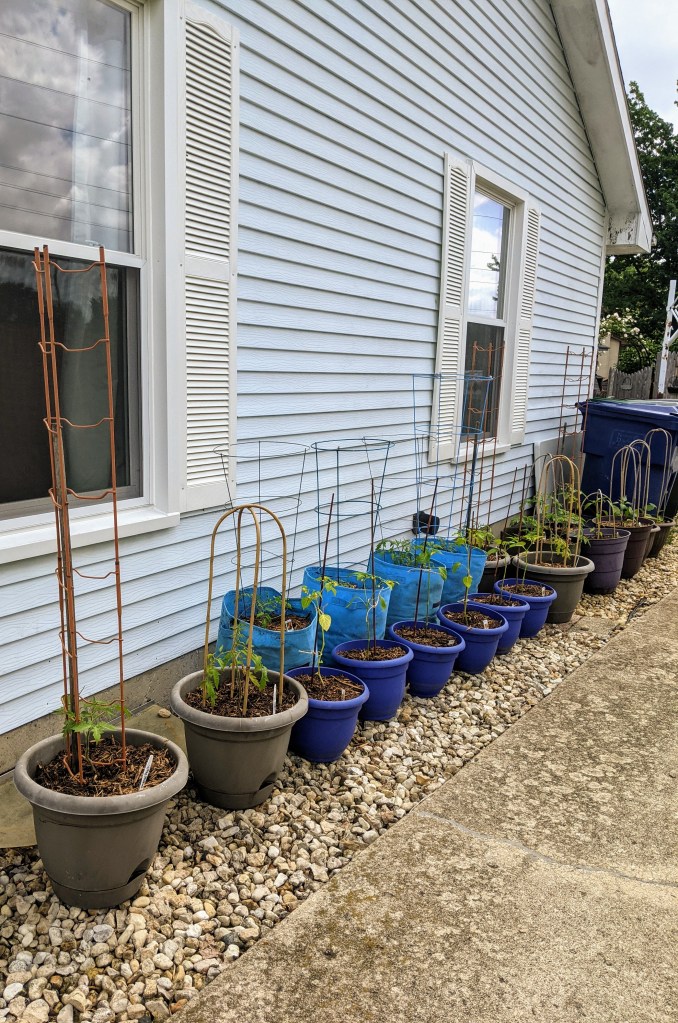
Container Gardening
PLANT DOLLY – I grow many plants, both edible and ornamental, in containers. Many of my containers are large and heavy–too heavy for me to lift and move on my own. Instead I use the plant dolly that my husband gave me for Christmas one year–one of the best gifts you could give any gardener! It’s designed specifically to hook over the lip of a plant container, but I’ve used it with buckets and other heavy things like bags of potting soil.

SELF-WATERING CONTAINERS – One of the difficulties of container gardening is keeping the containers watered. Bigger containers require less watering, and self-watering containers require even less. I like the kind that come with their own saucer, such as this one.
If you cannot find those or prefer a greater variety of sizes and colors, then try these. But if you use these, you must drill the drainage holes yourself AND add a saucer. Without a saucer to hold the water in the reservoir at the bottom of the pot, the “self-watering” feature will do you no good. I have several blue pots in smaller sizes like this that I use with clear plastic saucers.

NOTE: Whether you’re using self-water containers (above) or fabric pots (below), be sure to choose the correct size for the plants you are growing. Most tomato plants typically require containers that are 20-gallon size or larger. A 15-gallon container is suitable for growing potatoes, an eggplant or 1-3 pepper plants, depending on the variety.
FABRIC POTS or GROW BAGS
I always thought that fabric containers would be difficult to keep watered, so I usually recommend self-watering containers for tomato plants. However, a Smart Pot representative at the 2018 Independent Garden Center Show pointed out the root pruning benefits of their pots to me and gave me one to try out. I planted my #1 favorite tomato in it, Super Sweet 100s, and I was super impressed with the results.
This type of container is available in a wide variety of styles, sizes, and colors. Below are my current top recommendations. Let me know if you don’t see what you’re looking for.
FABRIC POTS FOR GROWING TOMATOES
Size matters when it comes to growing tomato plants, especially the indeterminate varieties, which do not stop growing. You’ll need a 20-gallon size container or larger. Be sure to provide adequate support at the time you plant. You could use a Gardener’s Supply Company tomato ladder, as I did, or make a teepee with three bamboo stakes.

If you’re going to buy more than one or two, try these other brands with better prices:
5-pack of 30-gallon black fabric pots OR 5-pack of 20-gallon black fabric pots
FABRIC POTS FOR GROWING POTATOES (Revised)
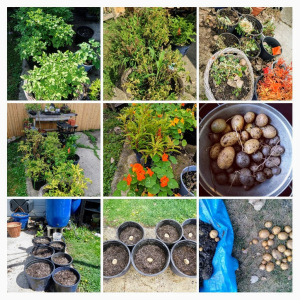
After posting about growing potatoes in containers, I received several inquiries. For growing potatoes, you should use containers that are 15-gallon size or larger. If you don’t already have containers that size, then you might want to try fabric pots that have a flap on the side. This way, you can easily get in and harvest early new potatoes without disturbing the top of the container too much. I say that because I’ve planted nasturtiums with my potatoes (see middle picture to the left), and they did not like being disturbed when I harvested some early potatoes.
Unfortunately, Smart Pot does not currently make containers with side flaps. I found several brands which do have the side flaps, but they all have a white liner which disintegrates over time. I bought these pretty blue ones, for example, and a couple of the liners were gone by the end of the first season. However, I can still continue to use them without the liner. Apparently potato growers must choose between having the side flap or avoiding the liner. I’ve included both options below.
- Smart Pot 15-gallon fabric containers, NO FLAP: black or tan
- Cheaper brand, NO FLAP: 6-pack of black 15-gallon fabric containers
- 2-pack of 15-gallon fabric pots WITH FLAP – black & green
- 2-pack of 15-gallon fabric pots WITH FLAP – black & khaki
4-packs of 15-gallon fabric pots WITH FLAPS, available in the following colors:
Garden to Table Cooking
Cooking Pans: I’m always sharing my garden-to-table food ideas. Scanpan is by far the best nonstick cookware I have ever used. The surface does not flake off so you can even use metal utensils with it. Plus you can actually brown meats in it. I own three pans that I use regularly: a 2-piece fry pan set and a covered saute pan. If you get any of their pans, make sure that you follow their user guide instructions because the lifetime warranty does not cover overheating.
For just about everything else, I use my AllClad MC2 cookware set. It’s better than some of AllClad‘s more expensive lines because the aluminum core goes up the sides of the pans, not just throughout the bottom. These pans cook evenly and retain heat well.
Whipped Cream Dispenser: I’d rather have real whipped cream with berries from my garden or any dessert like Fresh Strawberry Pie—not something from a tub or can! This all-metal whipped cream dispenser makes it just as convenient to whip heavy cream yourself and store it for several uses. You’ll need nitrous oxide cartridges to go with it.
Making Guacamole: My secret ingredient is fleur de sel, the BEST of all salts.The two tools I use are a lime press and a molcajete (mortar and pestle made from lava rock). The lime press is a must in my opinion, but the molcajete isn’t. It’s fun to use and makes a great presentation (so authentic!), but you could just mush everything up with a fork in a bowl instead and use a garlic press for the garlic.

Cake Decorating – In honor of National Cake Decorating Day, October 10, I’m adding the flower spikes I use to decorate cakes with fresh flowers. (For more garden-to-table cooking tools, such as the garlic roller mincer that I recently demonstrated, scroll further down to “Garden-to-Table Cooking.”)
Garden Clothes
I usually wear old jeans and old shoes in the garden, often with holes in them. But when it comes to my shirt, I prefer a long-sleeved one that will provide UPF sun protection while still keeping me as cool as possible on hot sunny days. I still haven’t found the perfect gardening shirt and wish that a clothing company would let me design one for them. In the meantime, this is what I’ve got. My current favorite is this “fishing shirt” with UPF 5o+ UV protection and a vented back.
I got it last year as a replacement for one of my Coolibar shirts that I used for several years. Those had more mesh vents, which I liked, but much too much Velcro. Whenever I washed them, the Velcro on the cuffs would get stuck to the mesh on the back and mess it up. Now Coolibar makes a travel shirt with the same vents but button tabs and cuffs. I may give it a try if I see it go on clearance.
Books
I got to hear Doug Tellamy speak in person a number of years ago in Bolingbrook at a Wild Ones (Greater DuPage Chapter)—fantastic! An upcoming opportunity to hear him speak again has prompted me to recommend his books:
At some point, I will add more books. Right now, I’m just recommending what I think is currently the best deal. Melissa Norris is offering nice bonuses for ordering her book The Family Garden Plan–and it’s on sale! 📗
FIRST buy the book (preferably through my affiliate links here so I get more pennies for plants 😉):
Paperback, currently $19.17 – https://amzn.to/39lcr1a
Kindle, currently only $4.99 – https://amzn.to/3aqoZ8y
THEN get your receipt number and apply for Melissa’s bonuses by filling out the form at the bottom of this page: https://melissaknorris.com/familygardenplan/
It’s that easy! Not only do you get a PDF of the charts and worksheets in the book, but also you get her Organic Soil Amendment Guide and access to her videos on Crop Rotation, Companion Planting, and Seed Saving 101.
💸That’s a great deal IMO, especially if you buy the Kindle book, like I did. (Plus Amazon applied the digital credits I’d earned by selecting No-Rush Shipping on prior Amazon orders. 👏)
This next one isn’t a gardening book, but it’s a great deal: The Whole30 is FREE on Kindle if you’re an Amazon Prime member! And if you’re not or don’t want an ebook, the hardcover is on sale for almost half its original price–still a good deal. While doing the Whole30, I’ve been cooking with all the wonderful produce I’ve grown in my garden. This plan fits right in with my garden-to-table way of eating.
As you know, I just love edible flowers, and here’s the book that got me started on growing them myself: Edible Flowers: From Garden to Palate by Cathy Wilkinson Barash. She also wrote a followup book, Edible Flowers: Desserts & Drinks. Unlike most of the lists of edible flowers found on the internet, those in her books have been carefully vetted by scientists. These books are the best resource on edible flowers.
The Seasons on Henry’s Farm: A Year of Food and Life on a Sustainable Farm is delightful book for anyone interested in the story behind the food you get at the farmers’ market or from your CSA. Plus, it’s wonderfully inspiring for home gardeners like me, who are growing some of their own food. I own both the Kindle and the paperback version.

Winter Containers and Decorations
WEATHERPROOF BERRY BRANCHES – For outdoor containers, I use fake berry branches that are labeled for outdoor use. This is a must for me because I reuse them from year to year. When necessary, I retouch them with nail polish. Here are several styles and sizes:
OUTDOOR VOTIVE CANDLES WITH REMOTE – I’ve long dreamed of being able to light all the candles around my deck quickly and easily–with a remote! And now I can do it with these remote-operated, indoor/outdoor votive candles. Check out my video showing off how these work in the winter.
TEALIGHT CANDLES WITH REMOTE – My snowman collection includes a bunch of candle holders for tealights, and it takes a while to go around and turn them all on or off. I have to pick each one up and flick the switch under it. This year I’m replacing them all with these LED Tealight Candles with Remote, so I could just point the remote and click–so much easier!
Earlier winter decorating videos:
OUTDOOR STRING LIGHTS – Adding lights to our award-winning “Mackinac Island Garden” really took it to the next level. For a small garden like this, I chose a long strand of small lights that are only 1′ apart. They’re shatterproof as well as weatherproof. That’s a good thing because one fell on our kitchen floor while we were unpacking the box, and it just bounced like a ping pong ball.
Valentine’s Decor for the Garden:

Galvanized metal hearts are a great choice for outdoor decor because they hold up to our winter weather.👌 Plus, the casual look and the pops of red go well with my winter containers and their rusty metal ornaments and red berries.
10″ metal heart – https://amzn.to/3cq9n9h
14″ red metal heart – https://amzn.to/39m8ooB
15″ black metal “love” sign – https://amzn.to/3c9rZKp
Winter Sowing & Seed Starting
Seed Starting Supplies: I’ve just begun indoor seed starting, and I’ve been winter sowing for the last few weeks. For most indoor seed starting, you’ll need grow lights. I use plain shop light fixtures, hung with chains and S-hooks so that I can move them up and down as the seedlings grow. Instead of buying pricey lights labeled as “grow lights,” I have used fluorescent lights, one COOL one and one WARM one, in each fixture. However, now we replace those with two daylight spectrum LED lights that would fit such a fixture. Each light fixture is attached to a power strip which is plugged into a programmable timer. For seeds that germinate better at warmer temperatures, you will also need a heat mat. This one is only $14, well worth the investment if you’re going to get serious about seed starting.
Winter Sowing Supplies: You can avoid the above purchases if you do your seed starting outdoors with the winter sowing method. See my Winter Sowing Tutorial for details. (If you want me to write a tutorial for indoor seed starting, please let me know by posting a reply saying so in the comment section below my Winter Sowing Tutorial.) The only supplies you might need to purchase for winter sowing are either a Garden Marker or grease pencils for labeling your containers in a way that will not fade when exposed to the elements for many weeks. For winter sowing, you should use a potting mix for containers rather than a seed starting mix.
For growing the seeds, you can buy seed starting cell-packs, trays and domes, or you could recycle plastic containers from produce and other store-bought goods. Whichever you use, you should fill them with a good quality seed starting mix.
MY FAVORITE GARDEN TOOLS 2020
The following is an excerpt from the November 2020 issue of The Gardener Wife newsletter.
This is a good year for early Christmas shopping as well as early decorating. The pandemic has caused shipping delays since it first began, and the delays will likely get worse the closer we get to Christmas. Here’s a list of my favorite garden tools. Many of them I got as gifts from my husband. I recommend putting these on your own wish list as well as giving them to any gardeners in your life. Some would make good gifts for non-gardeners, too!
Blade Sharpener – I’m starting my list with a little stocking stuffer. This handy implement allows me to sharpen tools on the go. It keeps them in good shape until the next annual cleaning and sharpening of all my tools.
Plant Dolly – I grow many plants, both edible and ornamental, in containers. Many of my containers are large and heavy–too heavy for me to lift and move on my own. I used to have to ask my husband to move those heavy pots around for me. But now I tell him to use the plant dolly he gave me to move them! Actually, it’s nice to be able to move large pots myself without hurting my back or re-injuring my shoulder. This dolly is designed specifically for plant containers, but I’ve used it with 5-gallon buckets and other heavy things like bags of potting soil.
Hori Hori Knife – I use this super versatile tool for transplanting, weeding, digging, planting, and even sawing through grasses. Every gardener needs one of these!
CobraHead – Made in the USA, this is another great tool for cultivating and planting, as well as weeding. It comes in three sizes, and the blue handles are made from recycled materials.

Root Slayer Shovels – Once you get one of these amazing tools made by Radius, you’ll want the others, too. I started with the weeder, and then I realized that the serrated shovel would make it possible for little old me to dig up large shrubberies all by myself. So I bought a bundle set with two different sized shovels and an edger. When my husband or sons are around to help me with the digging or edging, these tools make the jobs easier for them also.
- Root Slayer Bundle
- Root Slayer Shovel
- Root Slayer Nomad
- Root Slayer Round Head Shovel
- Root Slayer Perennial Shovel
- Root Slayer Edger
- Root Slayer Weeder
Root Slayer Hand Tools – Radius also makes a Root Slayer trowel and a soil knife, good for any tough jobs when you’re down on your hands and knees.
Stand Up Weeder – I use the Root Slayer Weeder above in my garden beds, but it makes too big a hole for digging up dandelions from my lawn. Instead I use a claw weeder like this one with a lever to step on. (I used to have the kind with a round knob at the top to push down, but it did not last long.) I try to keep my lawn organic, so we sometimes have a LOT of weeds to pull. That’s why I need a sturdy one like this. As a plus, it’s actually fun to use.
Compost Crank – I always found it difficult to mix the compost inside our compost bin, but this tool makes it easy. You just turn the handle until the corkscrew tip gets to the bottom, and then lift it up. Keep doing that all around the bin until everything is mixed. I also use it for mixing up batches of potting mix.
Tumbling Composter – Another option is to get a compost bin that you can spin around. I use it for composting kitchen scraps. Mine doesn’t have two chambers like this one does. This newer design lets one side finish composting while you are feeding the other side.
Gardening Shirt – I don’t like to wear sunscreen all over when I’m working in the dirt, so I look for long-sleeved shirts that would provide UPF sun protection while still keeping me as cool as possible. Maybe someday when I’m a big influencer, a clothing company will let me design the perfect gardening shirt for them. In the meantime, my current favorite is this “fishing shirt” with UPF 5o+ UV protection and a vented back.
Multipurpose Garden Cart – This cart makes it easy to tote all kinds of stuff around the yard. I use it mostly for watering my many containers with rain barrel water. This is an idea that a friend shared with me and I love it: I fill just the bottom third or so of the cart with rain barrel water (about 5 gallons), wheel it over to my containers, and use an old pot as a ladle to water the plants. It’s a lot easier than lugging a heavy watering can back and forth!
Vacuum Sealer – This is, I know, more of a kitchen tool than a gardening tool. I’m including it here because I’ve found FoodSaver vacuum sealers to be the BEST way to preserve my precious garden harvests in the freezer and to protect them from getting freezer burn. Since I love appetizers and cheese, I also use mine frequently to keep cheese fresh as long as possible and to keep opened crackers crisp (using the canning lid accessory with a half-gallon or gallon-size jar).
This machine is definitely worth the investment. I’m not recommending the cheapest of the line, however, because gardeners need a model with the function for sealing moist food–such as blanched garden veggies–as well as dry food. The model I currently own is no longer available, but here are others that have this necessary function.
- FoodSaver Vacuum Sealer – Space Saving Model, black
- FoodSaver Vacuum Sealer – Space Saving Model, white
- FoodSaver Vacuum Sealer with Handheld Sealer
- FoodSaver Vacuum Sealer with Handheld Sealer and Automatic Bag Detection
- FoodSaver Vacuum Sealer with Handheld Sealer, Automatic Bag Detection, and Bag Maker
- FoodSaver Accessory Jar Lid Kit – Using these lid accessories with canning jars of various sizes is better than buying FoodSaver canisters. All of my plastic FoodSaver canisters eventually cracked; glass jars have not. And the jars are cheaper!
FoodSaver Bags and Rolls are pricey compared to zip-close plastic storage bags, of course, but they’re worth it for their superior long-term storage ability. The FoodSaver works only with bags that have an embossed air channel design. Just remember to allow extra space if you plan to open and reseal your bags because the only way to open them is to cut below the seal. Thus the bag gets smaller with every use.
Digital Probe Meat Thermometer – Since I’ve already wandered into kitchen tools and it’s Thanksgiving week, I’m going to repeat my #1 Turkey Tip, which I shared in my newsletter last year. Do not overcook your turkey. I don’t care if you’re roasting, frying, grilling, smoking, brining, basting or bagging your turkey: the secret to moist white meat is to stop cooking it as soon as it’s done. I recommend this digital thermometer probe that beeps at you when the meat hits its correct internal temperature, 165°F for turkey. It’s also handy for cooking other kinds of meat.
